AC Joint Injury: Managing Shoulder Pain
Understanding AC Joint Injuries An Overview
The acromioclavicular (AC) joint, located at the top of the shoulder where the clavicle (collarbone) meets the acromion (part of the scapula), is crucial for shoulder stability and movement. An AC joint injury, often referred to as a separated shoulder, occurs when the ligaments surrounding this joint are stretched or torn. These injuries are common, especially among athletes and individuals involved in activities with a high risk of falls or direct blows to the shoulder.
AC joint injuries range in severity from mild sprains to complete separations. The severity is graded from I to VI, with Grade I being a minor sprain and Grade VI being a severe dislocation. Understanding the different grades is important for appropriate diagnosis and treatment.
AC Joint Anatomy and Function Key Considerations
To fully grasp AC joint injuries, it's essential to understand the joint's anatomy and function. The AC joint is a synovial joint, meaning it's lined with cartilage and contains synovial fluid for lubrication. The primary ligaments supporting the AC joint are the acromioclavicular (AC) ligaments and the coracoclavicular (CC) ligaments (conoid and trapezoid ligaments). These ligaments work together to stabilize the joint and allow for a full range of motion in the shoulder.
The AC joint allows for movements like arm elevation, rotation, and adduction. Its stability is vital for performing everyday tasks and athletic activities. When these ligaments are damaged, the stability of the joint is compromised, leading to pain and limited function.
Common Causes of AC Joint Injuries Identifying Risk Factors
AC joint injuries are often caused by direct trauma to the shoulder. Common causes include:
- Falls: Falling directly onto the shoulder, especially with the arm adducted (close to the body), can cause significant force on the AC joint.
- Sports Injuries: Contact sports like football, hockey, and rugby have a high incidence of AC joint injuries due to collisions and tackles.
- Direct Blows: A direct blow to the shoulder from a car accident, a fight, or a fall can also cause an AC joint injury.
- Lifting Heavy Objects: In some cases, repeatedly lifting heavy objects can strain the AC joint and lead to injury.
Athletes, especially those participating in contact sports, are at a higher risk. Also, individuals with previous shoulder injuries may be more susceptible to AC joint problems.
Diagnosing AC Joint Injuries Recognizing Symptoms and Tests
Diagnosing an AC joint injury involves a combination of physical examination, medical history, and imaging studies. It's crucial to get an accurate diagnosis to determine the severity of the injury and the appropriate treatment plan.
Symptoms of AC Joint Injuries What to Look For
The symptoms of an AC joint injury vary depending on the severity of the injury. Common symptoms include:
- Pain: Pain is the most common symptom and is typically localized to the top of the shoulder. The pain may worsen with movement or pressure on the AC joint.
- Swelling: Swelling and bruising around the AC joint are also common.
- Tenderness: The AC joint will be tender to the touch.
- Deformity: In more severe injuries (Grades III-VI), there may be a visible bump or deformity on the top of the shoulder due to the displacement of the clavicle. This is often referred to as a "step-off" deformity.
- Limited Range of Motion: Difficulty moving the arm and shoulder, especially lifting it overhead or across the body.
- Weakness: Weakness in the shoulder and arm.
If you experience any of these symptoms after a shoulder injury, it's important to seek medical attention.
Diagnostic Tests for AC Joint Injuries Imaging and Examination
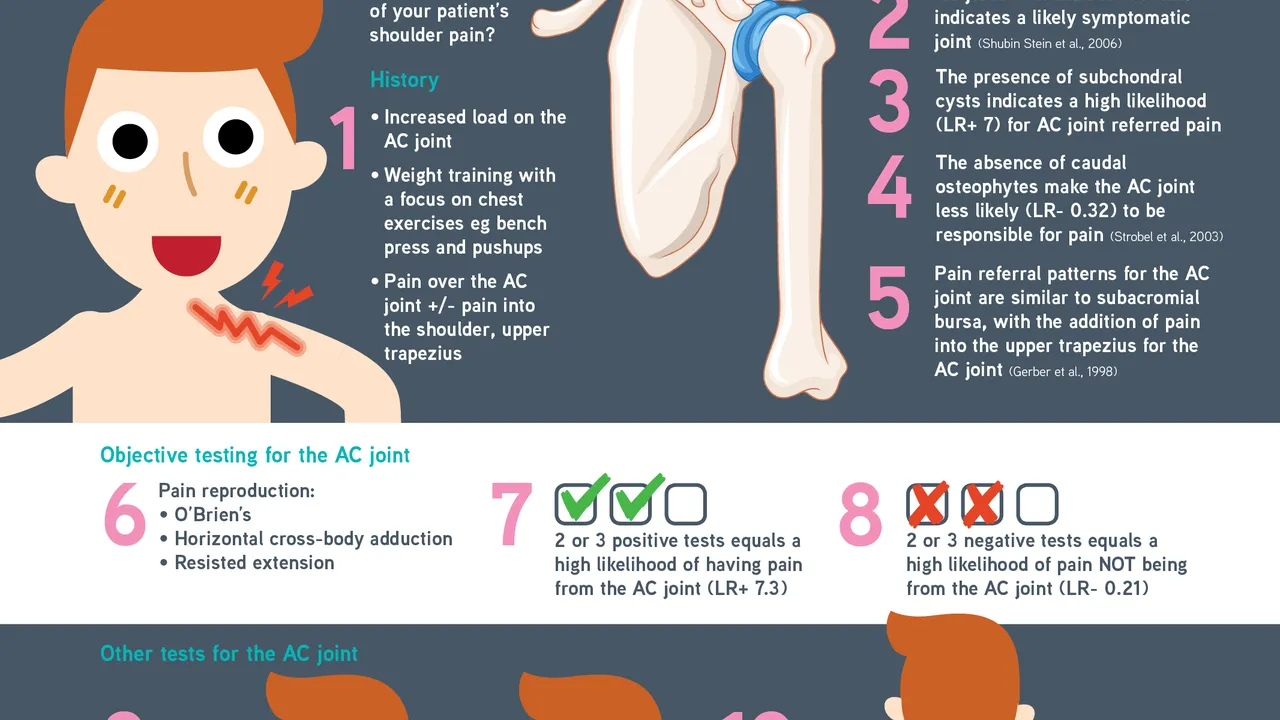
A physical examination is the first step in diagnosing an AC joint injury. The doctor will assess your range of motion, check for tenderness and swelling, and perform specific tests to evaluate the stability of the AC joint. Common tests include:
- Cross-body Adduction Test: This test involves bringing the arm across the body. Pain in the AC joint during this movement suggests an AC joint injury.
- AC Joint Palpation: The doctor will gently press on the AC joint to check for tenderness.
- O'Brien's Test: While primarily used to assess labral tears, this test can also provoke pain in the AC joint.
Imaging studies are often used to confirm the diagnosis and determine the severity of the injury. Common imaging studies include:
- X-rays: X-rays can show the alignment of the AC joint and any displacement of the clavicle. They are particularly helpful in diagnosing Grades III-VI injuries. Stress X-rays (holding a weight) can sometimes be used to better visualize the extent of the separation.
- MRI: While not always necessary, an MRI can provide more detailed images of the soft tissues around the AC joint, including the ligaments. This can be helpful in diagnosing Grades I and II injuries and ruling out other shoulder problems.
Treatment Options for AC Joint Injuries A Comprehensive Guide
The treatment for an AC joint injury depends on the severity of the injury. Grades I and II injuries are typically treated non-operatively, while more severe injuries (Grades III-VI) may require surgery.
Non-Operative Treatment for AC Joint Injuries Conservative Approaches
Non-operative treatment focuses on pain relief, reducing inflammation, and restoring function. Common non-operative treatments include:
- Rest: Avoiding activities that aggravate the shoulder.
- Ice: Applying ice packs to the shoulder for 15-20 minutes several times a day to reduce swelling and pain.
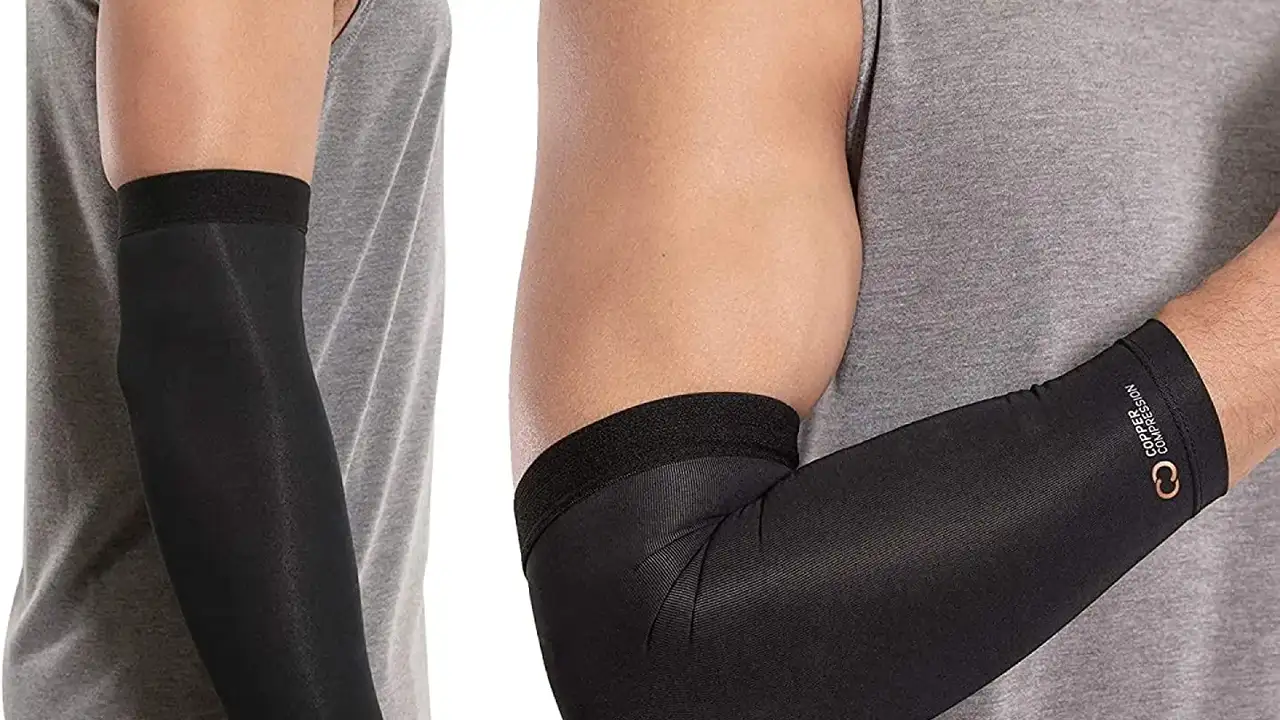
- Compression: Using a compression bandage to minimize swelling.
- Pain Medication: Over-the-counter pain relievers like ibuprofen (Advil, Motrin) or naproxen (Aleve) can help reduce pain and inflammation. In some cases, a doctor may prescribe stronger pain medications.
- Physical Therapy: Physical therapy is crucial for restoring range of motion, strength, and function. A physical therapist can guide you through exercises to strengthen the muscles around the shoulder and improve stability.
- Shoulder Sling: A shoulder sling is often used to immobilize the arm and provide support to the AC joint. The length of time you need to wear a sling depends on the severity of the injury.
- Cortisone Injections: In some cases, a cortisone injection into the AC joint can help reduce pain and inflammation. However, cortisone injections are typically used sparingly as they can have potential side effects.
Surgical Treatment for AC Joint Injuries When is Surgery Necessary
Surgical treatment may be necessary for more severe AC joint injuries (Grades III-VI) or when non-operative treatment fails to provide adequate pain relief and function. The goal of surgery is to restore the stability of the AC joint.
Several surgical techniques are available, including:
- AC Joint Reconstruction: This procedure involves reconstructing the damaged ligaments using grafts. The grafts can be taken from other parts of the body (autograft) or from a donor (allograft).
- Coracoclavicular (CC) Ligament Reconstruction: This procedure focuses on reconstructing the CC ligaments, which are crucial for shoulder stability.
- Distal Clavicle Excision (Mumford Procedure): This procedure involves removing a small portion of the distal clavicle (the end of the collarbone). This can relieve pain caused by arthritis or impingement in the AC joint. However, this procedure is less commonly used for acute AC joint injuries.
- Arthroscopic AC Joint Stabilization: This minimally invasive procedure involves using small incisions and a camera to repair or reconstruct the AC joint. Arthroscopic techniques can often lead to faster recovery times and less scarring.
The specific surgical technique used will depend on the severity of the injury, the patient's age and activity level, and the surgeon's preference.
Post-Operative Rehabilitation Following AC Joint Surgery
Rehabilitation is crucial after AC joint surgery. A physical therapist will guide you through a structured program to restore range of motion, strength, and function. The rehabilitation process typically involves:
- Immobilization: The arm will typically be immobilized in a sling for several weeks after surgery.
- Range of Motion Exercises: Gentle range of motion exercises will be started early in the rehabilitation process.
- Strengthening Exercises: Strengthening exercises will be gradually introduced as tolerated.
- Functional Exercises: Functional exercises that mimic everyday activities and sports-specific movements will be incorporated as you progress.
The recovery time after AC joint surgery can vary depending on the specific procedure and the individual patient. It can take several months to fully recover and return to all activities.
Recommended Products for AC Joint Injury Management
Managing an AC joint injury often involves using various products to support healing, reduce pain, and improve function. Here are some recommended products with their use cases, comparisons, and detailed information including pricing (estimated and subject to change):
Shoulder Immobilizer Slings Providing Support and Stability
A shoulder immobilizer sling is crucial for supporting the injured shoulder and preventing further damage, especially during the initial healing phase. It restricts movement and allows the ligaments and tissues to recover.
Use Cases
- Post-injury immobilization: Immediately after the injury to stabilize the shoulder.
- Post-operative support: Following surgery to protect the repaired joint.
- Pain management: Reducing pain by limiting shoulder movement.
Product Recommendations
- DonJoy UltraSling ER: This sling is designed for comfortable immobilization and external rotation. It's ideal for post-operative use, especially after rotator cuff repairs or shoulder dislocations.
- Features: Breathable Airmesh material, universal fit, adjustable straps.
- Pros: Comfortable, good immobilization, easy to adjust.
- Cons: Can be bulky, may not be suitable for all body types.
- Estimated Price: $75 - $120
- Med Spec Universal Sling: A more basic sling that provides good support and is suitable for general AC joint injuries.
- Features: Lightweight, adjustable, comfortable padding.
- Pros: Affordable, easy to use, good for mild to moderate injuries.
- Cons: Less supportive than specialized slings.
- Estimated Price: $30 - $50
Product Comparison
The DonJoy UltraSling ER is a premium option, offering superior comfort and support, especially for post-operative needs. The Med Spec Universal Sling is a more budget-friendly option suitable for less severe injuries.
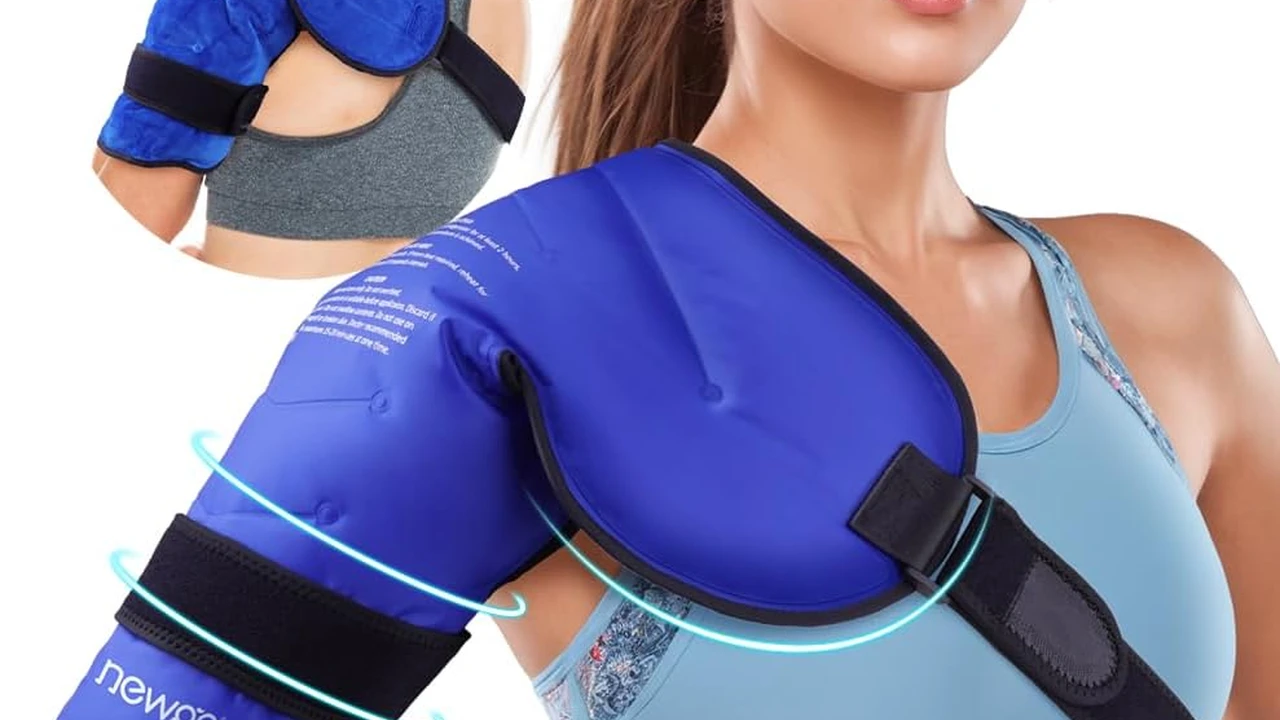
Cold Therapy Systems Reducing Inflammation and Pain
Cold therapy systems are essential for managing pain and inflammation associated with AC joint injuries. They deliver consistent cooling to the injured area, promoting faster healing.
Use Cases
- Acute injury management: Reducing swelling and pain immediately after the injury.
- Post-activity recovery: Cooling the shoulder after physical therapy or exercise.
- Chronic pain relief: Managing persistent pain and inflammation.
Product Recommendations
- Polar Products Active Ice 3.0 Cold Therapy System: This system provides consistent cooling with adjustable temperature settings.
- Features: Digital temperature control, adjustable compression, quiet operation.
- Pros: Consistent cooling, easy to use, effective pain relief.
- Cons: Relatively expensive, requires electricity.
- Estimated Price: $180 - $250
- CryoDerm Cold Therapy Gel: A topical analgesic gel that provides temporary pain relief.
- Features: Contains natural ingredients, easy to apply, fast-acting.
- Pros: Convenient, affordable, provides immediate relief.
- Cons: Relief is temporary, not as effective as ice packs for reducing inflammation.
- Estimated Price: $15 - $30
Product Comparison
The Polar Products Active Ice 3.0 is a powerful system for consistent cooling, while CryoDerm Cold Therapy Gel offers a convenient and affordable option for temporary pain relief.
Resistance Bands Strengthening Shoulder Muscles
Resistance bands are invaluable for strengthening the muscles surrounding the shoulder joint, improving stability and preventing re-injury. They provide variable resistance that can be adjusted as strength improves.
Use Cases
- Rehabilitation exercises: Strengthening the rotator cuff and surrounding muscles.
- Improving range of motion: Gradually increasing shoulder flexibility.
- Preventing future injuries: Maintaining shoulder strength and stability.
Product Recommendations
- TheraBand Resistance Bands: These bands are available in various resistance levels, making them suitable for all stages of rehabilitation.
- Features: Color-coded resistance levels, durable latex material, versatile.
- Pros: Affordable, easy to use, effective for strengthening.
- Cons: Can snap if overstretched, may not provide enough resistance for advanced users.
- Estimated Price: $10 - $20 per band
- Bodylastics Resistance Bands: These bands feature a clip system that allows you to combine bands for greater resistance.
- Features: Durable construction, clip system for adjustable resistance, door anchor included.
- Pros: Versatile, provides high resistance, suitable for advanced training.
- Cons: More expensive than standard resistance bands, can be bulky.
- Estimated Price: $40 - $80 per set
Product Comparison
TheraBand Resistance Bands are a cost-effective option for basic strengthening exercises, while Bodylastics Resistance Bands provide a more versatile and durable solution for advanced training.
Shoulder Braces Providing Support and Stability During Activity
Shoulder braces provide support and stability during physical activities, helping to prevent further injury and manage pain. They are particularly useful for athletes returning to sports after an AC joint injury.
Use Cases
- Returning to sports: Providing support and stability during athletic activities.
- Preventing re-injury: Reducing the risk of further damage to the AC joint.
- Managing pain: Limiting shoulder movement and reducing pain.
Product Recommendations
- McDavid Shoulder Support: This brace provides moderate support and compression, ideal for mild to moderate AC joint injuries.
- Features: Adjustable straps, breathable neoprene material, comfortable fit.
- Pros: Good support, comfortable, easy to adjust.
- Cons: May not be suitable for severe injuries, can restrict movement.
- Estimated Price: $40 - $60
- Shock Doctor Shoulder Support: This brace offers a higher level of support and is suitable for more severe injuries or post-operative use.
- Features: Adjustable straps, X-strap stabilizer, comfortable compression.
- Pros: Excellent support, durable construction, reduces pain.
- Cons: Can be bulky, may restrict movement, more expensive.
- Estimated Price: $70 - $100
Product Comparison
The McDavid Shoulder Support is a comfortable and versatile option for mild to moderate injuries, while the Shock Doctor Shoulder Support provides a higher level of support for more severe injuries or post-operative use.
Preventing AC Joint Injuries Strategies and Recommendations
Preventing AC joint injuries involves taking steps to minimize the risk of falls, direct blows to the shoulder, and overuse. Proper conditioning, protective gear, and awareness can all help reduce the likelihood of injury.
Proper Warm-up and Stretching Preparing the Shoulder for Activity
A proper warm-up and stretching routine is essential for preparing the shoulder muscles and ligaments for activity. This helps increase blood flow, improve flexibility, and reduce the risk of injury.
- Arm Circles: Perform arm circles in both directions to warm up the shoulder muscles.
- Shoulder Rolls: Roll your shoulders forward and backward to loosen up the joint.
- Cross-Body Stretch: Bring one arm across your body and gently pull it closer with the other arm.
- Sleeper Stretch: Lie on your side with your arm bent at a 90-degree angle. Gently push your forearm down towards the bed to stretch the rotator cuff muscles.
Strengthening Shoulder Muscles Building Stability and Resilience
Strengthening the muscles around the shoulder joint is crucial for providing stability and preventing injuries. Focus on exercises that target the rotator cuff muscles, as well as the deltoids, trapezius, and rhomboids.
- External Rotations: Use a resistance band to perform external rotations, which strengthen the rotator cuff muscles.
- Internal Rotations: Use a resistance band to perform internal rotations, which also strengthen the rotator cuff muscles.
- Rows: Perform rows with dumbbells or a resistance band to strengthen the back and shoulder muscles.
- Lateral Raises: Perform lateral raises with dumbbells to strengthen the deltoid muscles.
- Front Raises: Perform front raises with dumbbells to strengthen the anterior deltoid muscles.
Using Proper Technique in Sports and Activities Minimizing Risk
Using proper technique in sports and activities is essential for minimizing the risk of AC joint injuries. This includes learning how to fall properly, avoiding direct blows to the shoulder, and using appropriate equipment.
- Falling Techniques: Learn how to fall properly to minimize the impact on your shoulder. This may involve rolling onto your side or tucking your arm into your body.
- Protective Gear: Wear appropriate protective gear, such as shoulder pads, when participating in contact sports.
- Proper Lifting Techniques: Use proper lifting techniques when lifting heavy objects to avoid straining the shoulder joint.
Maintaining Good Posture Reducing Strain on the AC Joint
Maintaining good posture is important for reducing strain on the AC joint. Poor posture can lead to muscle imbalances and increased stress on the joint.
- Sit Upright: Sit upright with your shoulders back and your chest open.
- Avoid Slouching: Avoid slouching or hunching over, as this can put strain on the shoulder joint.
- Ergonomic Workstation: Set up your workstation ergonomically to support good posture. This may involve adjusting your chair height, monitor position, and keyboard placement.
:max_bytes(150000):strip_icc()/277019-baked-pork-chops-with-cream-of-mushroom-soup-DDMFS-beauty-4x3-BG-7505-5762b731cf30447d9cbbbbbf387beafa.jpg)